
Sunday, July 25, 2010
Wednesday, July 21, 2010
No, I Didn't Die.
I *dyed* two 96 yard hanks of cotton yarn (good ol' Cream n Sugar) today, with my friend Andrea's help. They're closed up in plastic bags, sitting on folded paper bags to absorb the excess dyes and keep them from running all over and turning the yarn muddy looking. Tomorrow afternoon, they'll get rinsed (and rinsed, and rinsed some more) then put in the dryer. I can't wait to see how they turn out. Don't worry, there will be pictures. :)
Wednesday, July 7, 2010
Make Your Mark
(Dateline: April 98th, 2010 ;) )
 My dad and I recently learned about letterboxing. It's an informal treasure-hunt sort of game, similar to geocaching, that began with a gentleman's calling card left tucked into a bottle near a remote English pond in 1854. In the modern version of letterboxing, one follows clues left on a website to find a secret stash containing a rubber stamp and a logbook. The adventurer brings their own signature stamp and logbook along, stamps an image from their signature stamp into the letterbox's book, and takes an image of the letterbox's stamp away in their own logbook.
While there's no rule against using a store-bought stamp, either for your signature or for the letterbox, it's so much more personal to create your own design. Indeed, the vast majority of letterboxers use stamps of their own design. They may have the stamps custom made by a stationery company, or carve them themselves from rubber erasers. Being somewhat uncertain of my ablility to carve a rubber eraser, and displeased with the small size of the erasers I found, I went looking for an alternative material. I found it in craft foam sheets.
You will need:
One sheet of adhesive-backed craft foam
One sheet of 6 mm thick craft foam
A craft knife
A cutting surface
A stamp pad with a raised surface, or a watercolor pen
Your stamp design
Your design can be quite detailed, but you should probably try not to get too fancy with your first attempt. You can hand draw your design or use a graphics program to create one. Consider the size of your image carefully. It should be small enough to fit on a small logbook page, but large enough to be easy to cut out of the foam. I chose a daffodil design that I use elsewhere as well, and my dad created a simple radio tower design, alluding to his ham radio hobby. We decided that three inches in the largest dimension of our designs would likely fit well in most logbooks.
As you work with the adhesive-backed foam sheet, be careful not to press your fingernails into the foam. It will take impressions from your nails rather easily, and your stamped design may have small crescent-shaped voids as a result.
 I found that carbon paper refused to transfer to the foam, so I cut the designs out of their paper print-outs with the craft knife, then used them as stencils to apply the design to the foam. My daffodil design was already created in a stencil-like negative image, with the pieces of the flower cut from the background. With the finished stamp, the background would be printed, while the flower remained the white of the paper. My dad's radio tower, however, was a positive image with crossbars that needed careful handling in cutting the transfer stencil. I left thin bands of paper between the crossbars and the uprights on the paper stencil, to hold the design together. I would later cut through these lines when cutting the design from the foam sheet.
Place the stencil on top of the adhesive-backed foam and ink through the stencil with the stamp pad. (If your design has letters or any other element that requires a certain direction, make sure to put your stencil down backwards.) I had a little trouble getting all the smaller parts of the pattern inked, and by the time I did, there was a good bit of ink bleeding through the paper onto the foam. I think a smaller, dauber-type ink pad or a water color pen would have worked better, but I didn't have either of those, and I was able to see the design clearly enough on the foam to cut the design out.
With your craft knife, cut the design out of the foam. There are a couple things to which to pay attention as you cut. The first is that you don't undercut the edge of the stamp. It's best to angle the blade of your craft knife away from the piece at the point of the blade, so as to ensure adequate support to the edge of the foam. The other is that you either start at one side of the pattern and work across, or start at the center and work your way out. This is so that the piece you're cutting always has as much support from the surrounding foam as possible. On my daffodil, if I had cut all the petals first, then cut the trumpet out, I would likely have broken through the lines as the lack of support allowed the foam to stretch and flex.
 If your image has several separate pieces, and their exact placement on the stamp is important, don't just cut the pieces out willy-nilly. With my dad's radio tower, I chose to cut the tower out first, as the anchor of the design. I stripped the paper backing off of the adhesive back of the tower, and placed it on the 6 mm thick foam sheet. Then, one by one, I cut a lightning bolt, but did not remove it from the surrounding foam. Instead, I removed the paper backing from just the lightning bolt, fitted the surrounding foam around the tower on the 6 mm thick foam sheet, pressed the lightning bolt down, then removed the surrounding foam from the now-adhered bolt.
Once you have all the pieces of your design adhered to the 6 mm thick foam backing, cut the stamp from the rest of the sheet. Cut off any excess backing that isn't supporting the image. Doing this will help prevent accidental stamping of the edges of the backing. Ink your stamp and make a test imprint on a piece of paper. If you use watercolor pens, you can color different parts of the stamp different colors for a multicolor image.
Congratulations! You've made your very own personalized stamp. Now, go gently clean it with water and an old soft toothbrush. The ink will never completely dry on the foam, so cleaning it off will reduce accidental stamping on your clothes and furniture, as well as prevent a buildup of residue that can reduce the quality of your impressions.
Not only are craft foam stamps easy and fun to make, they are incredibly cheap! Having a 3" x 3" custom stamp made professionally costs about $25. Both the self adhesive foam and the 6 mm thick foam were a mere 99 cents per sheet. I made two stamps, and have enough foam left over for at least another four stamps of the same size. This means that each stamp used about 30 cents worth of foam. That's what I call thrifty!
Happy stamping!

For more information on letterboxing, visit the Wikipedia entry at http://en.wikipedia.org/wiki/Letterboxing .
Sunday, July 4, 2010
Summertime Tea-ser
 Happy Independence Day, America!
One of my favorite treats for summertime (and 4th of July barbeques, naturally) is suntea. The gentle warmth of the sunlight coaxes the flavor from even the cheapest Lipton's knock-off, without drawing out the bitter taste that boiling water stews from the leaves. Plus, there's something so relaxing about setting the jar of cool water and tea bags out, finding just the right sunny spot, then going about my business for an hour or two. With hot-brewed iced tea, I always worry that the container is going to either melt or break when I'm pouring hot tea over the ice, and it takes so long to cool to drinking temperature. Somehow, I associate the act of boiling the water for the tea with being in a hurry, and then the hurry is frustrated by the cooling time. Suntea never gets hot enough to threaten the pitcher or jar, and will often cool enough for drinking just in from the sun by pouring it over ice in your glass.
So, why am I talking about sun tea in a craft blog? Well, food can certainly be craft or art, completely aside from decorating or garnishing. Any foodie will tell you that. It's how the food tastes that really makes it art. Sculpting mashed potatoes into a bust of Beethoven would certainly be impressive, but if the potatoes taste like paste when they're served up, the dish is really a "bust."
While simple black tea makes a perfectly satisfying iced drink, I like to enhance the flavor by including a few bags of a flavored tea blend in the jar. Most often I choose Earl Grey, which is my favorite flavor of tea for drinking hot in cooler weather, but sometimes I fancy mint instead. (I also sun brew mint alone from time to time. Mint and black tea together are a wonderful hot drink, as well.) There are both peach and pear flavored herbal teas that are lovely added to a black suntea. If you like the flavors of flowers (some don't), try adding rose petals, lavender buds, or jasmine flowers. Just make certain the flowers are food grade, or from a garden that doesn't use chemical pesticides. Muslin bags for loose teas are available at most whole foods stores with the bulk teas, so you don't have to strain your tea to remove the flowers. If your black tea is loose as well, you can use a muslin spice bag, which is made to hold herbs and spices for flavoring a clear stock. The flowers or loose flavored tea and the black tea can go in the same bag.
My basic "recipe" for suntea is this:
1 gallon of drinking water (some folks get good water from the kitchen tap, some don't.)
8-10 bags of black tea (or 8-10 teaspoons of loose black tea in a muslin spice bag)
2-4 bags of flavored tea (or 2-4 teaspoons of loose flavored tea in a muslin bag)
Your jar or pitcher can be glass or plastic, and should be clear or translucent. A decorative print on the container is fine, as long as it still lets the sunlight through.
Fill the container up with the drinking water, and add the bag(s) of tea. If the cover for the container is screw-on (like a jar lid), try draping any strings from the bags over the edge of the container opening, making sure that the bags can still hang down into the water deep enough to submerge them. You should still be able to screw the lid on, and this will keep you from having to fish the sodden bags (and paper tags!) from the bottom of the container later.
Find a spot outside (or in a window sill) that will receive bright sunlight for at least a couple hours, and set your container there. Find something else to do for those couple hours until the tea is nicely colored. Remove the teabags and serve over ice.
I don't sweeten my tea in the jar anymore because I want others to be able to drink the tea with the sweetener of their choice, or with no sweetener at all if they prefer. Most manufactured stevia-based or artificial sweeteners dissolve pretty readily in a cold drink with just a couple stirs. Good old-fashioned sugar, on the other hand, likes to settle in a gritty, too-sweet pile on the bottom of the glass.
If natural sweetness is your preference, make a simple syrup. Combine a cup of granulated sugar and a cup of water in a pot over medium-high heat. Bring it to a boil, turn the heat down to just over a simmer, and stir for a minute until the sugar all dissolves. Take the syrup off the heat and let it cool to room temperature. You can either stir this directly into your jar of tea to sweeten the whole gallon, or keep it in a syrup pitcher for folks to sweeten their own glasses of tea.
Ahhhh. Tea. :)
Tuesday, April 6, 2010
In the Temple of the Marshmallow Kings
 Oh, I am a mad, mad craftwoman! Finding myself unable to procure the flower-shaped cake decorating sprinkles that I had so foolishly declined to purchase just the previous day, I turned to other methods of decorating an Easter cake. Powerful methods. Terrible methods.
Sugar-coated marshmallow methods.
Behold, the Temple of the Marshmallow Kings:

MuwAHAHAHAHAHAHAAAAAAAAAAcoughcough, ahem....

Marshmallow priests encircle their two-faced god, while worshippers bring more offerings of jelly-bird gems.
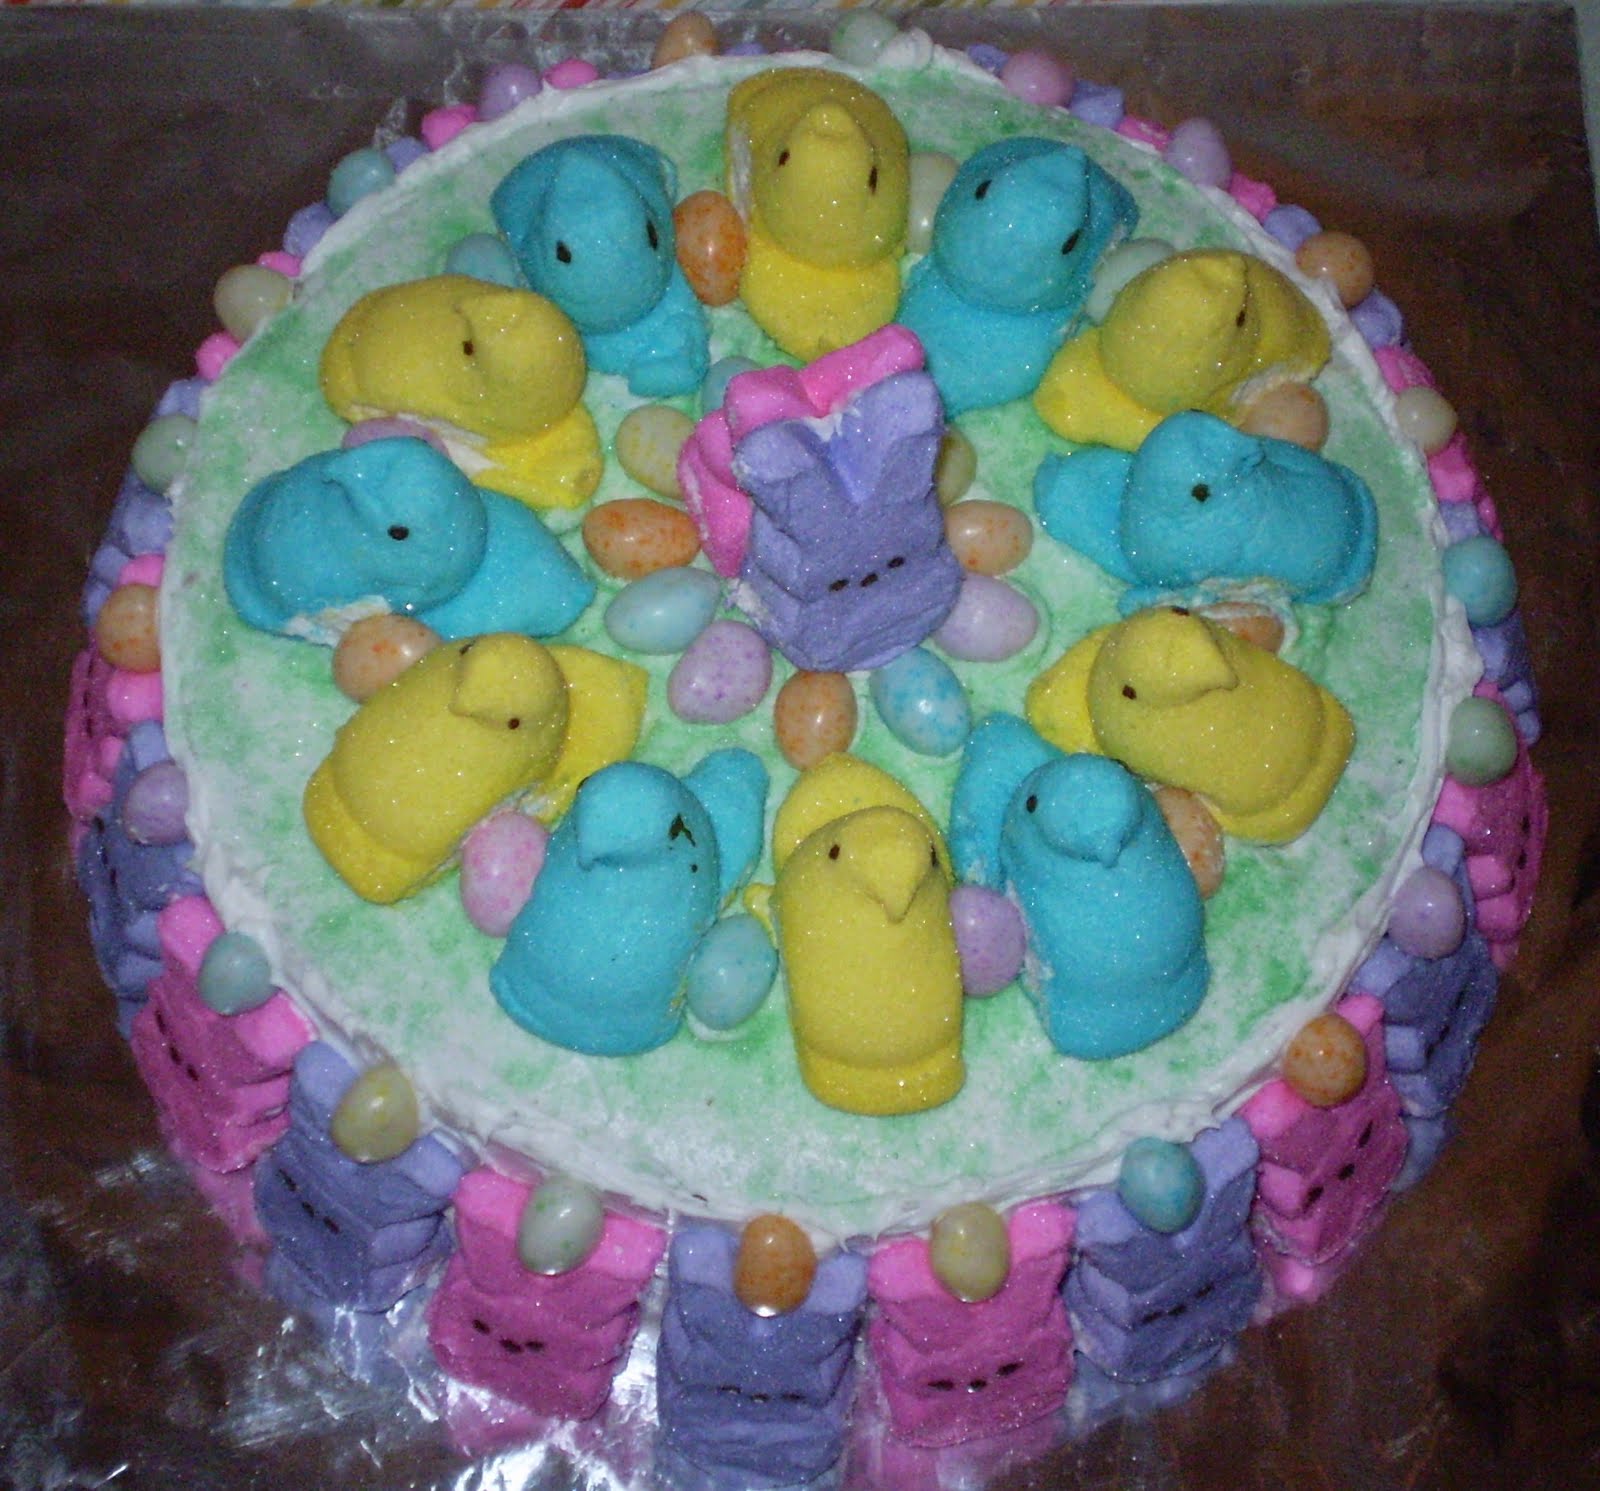
Those who pass within the temple walls find respite in the pastel splendor of the cakey sanctuary.

The cake itself was made using the method (but not the recipe) found at Omnomicom.
Saturday, April 3, 2010
A Turning Trick for Hookers
The date on this post is wrong. Today is March 34. ;)
Traditionally, when you're crocheting something with more than one row in it (which is anything other than a simple edging, of course), you get from the end of your current row to the beginning of the next row by crocheting a few chain stitches, which count as the first stitch of the next row. On flat pieces, this can make an edge that's a little wobbly looking, and on round pieces, it leaves a visible seam.
YouTube video poster TXCr1cket demonstrates a method for creating a freestanding double crochet stitch to replace those wobbly, seam-ly chains. It makes a nice even edge in flatwork, and a nearly invisible seam in round works. Watch and learn:
Saturday, February 20, 2010
You're getting veeery sleeeepyyyy...
 This spiral block is one of the crochet designs I'm using for a block swap I'm involved in. The other swappers liked the design so well, they asked if I had a pattern I could share with them. I don't, really, though if you can crochet a flat circle, I can tell you generally how I did it. Again, this isn't a pattern, so much as a guideline, and you do have to have at least a little experience with crochet to do this.
Start with a large slip knot, either color, doesn't matter. Into the loop of the slip knot, sc, hdc, 4dc. Pull your working loop large, and drop it off the hook. Attach the second color after the last dc (I just made a small slip knot, like you would start a chain with, and brought it through the loop from the back, then started working around the loop.). Repeat the same sc, hdc, 4dc in the loop. Pull the loop tight.
Now, still with the second color, work 2dc in each stitch of the first color. Enlarge and drop the loop, pick up the first color, pull the loop back down to working size, and work 2dc into 6 stitches of color 2.
So, at this point, you should have a center with 6 stitches of each color, and the first round of the spiral with 12 stitches of each color, with the colors ending on opposite sides of the spiral. From here, you just work flat, taking one color to the end of the other, and count the stitches you make, then take the other color to the opposite side of the spiral, making the same number of stitches in the same increase pattern.
When the spiral is almost as large as you want it, measure it across the ends of the spiral arms (we'll call this the X axis) and perpendicular to that (the Y axis). You will find that it's slightly larger across the X axis. Mine was about a half inch difference, much less than the height of 2 rows of dc. (Remember that what you do with one color you also do with the other, so each round increases the size by 2 rows.) What you have to do is work until you're about 6 stitches away from the narrowest point. Then work 4 hdc, 4 sc (this is going across the narrowest point), then 4 slp st, and stop, but don't break off yet. Repeat for the other color, also not breaking off yet. (Unless you're not making a block. This would be a nice design to make in a heavy natural fibre for trivets and coasters.)
As for turning a round spiral into a block, this is actually the hardest part to figure out. Count the stitches around your motif. Divide that by 4. Now take a good look at the edge of the piece, and decide how many stitches could reasonably be considered straight enough to be part of the edge of the block (we'll call this number N). Subtract N from your previous number. This is how many stitches need to be enclosed in a corner.
Decide how many sections of mesh you want to work into this area. A number that divides evenly, or within one stitch of even, is good. I made three sections worked over about 18 stitches total, each section worked over 6 stitches.
It gets a little confusing here. If you read slowly and work along with the instructions, I think you'll be okay.
From the end of one spiral arm, chain 1 or 2 more than the number of stitches that the first section is worked over, preferably an odd number of chains. (I chained 7) Join to the spiral at the appropriate place (6th stitch, for me), then repeat this until the last section. On the last section, chain half as many, then work a tall stitch to match the height of the chain (I worked a treble stitch), placing this stitch in the last stitch of the spiral to which the corner is attached.
Turn the work, chain a section of mesh, join to the middle of the next chain loop, continue to the last section, and work the last section as before, with the tall last stitch. You'll work 1 fewer sections of mesh than the previous row. Continue like this until you make a single last mesh section in the corner. Bind off.
Remember "N"? Count N around the spiral from the end of the mesh, join, and make another mesh corner. Then pick up the yarn from the other spiral arm and do it all again.
That's it. Please ask any questions in the comments here, so that others may learn from the answers as well. I'd love to see your interpretations of this pattern!
[Credit where it's due: Photo by S. Kelley]
Wednesday, January 27, 2010
Color Me Happy
 Every crafter is a visual artist, and, as such, works with color. You probably learned in grade school that red, blue, and yellow are the primary colors (of pigment, not light, but that's not the issue here), and that combinations of any two of those make the secondary colors, orange, green, and purple. You might have learned about complementary colors, colors opposite each other on the color wheel. And of course you know that black and white go with everything.
But what do you do when you're tired of primaries and secondaries, monochrome and two-tone, black and white? Unless you followed an art track in college, you probably don't know much more about color theory. What happens when you open your bead box, your yarn stash, your fabric closet, and don't know where to start?
Color Scheme Designer to the rescue! Created by Petr Stanicek as an aid to web site designers, CSD is an elegant, easy to use guide to color.
Above the color wheel on the left, there are buttons for selecting for six different color arrangements (monomchrome, complementary, triad, etc.). Once you've chosen that, you can pull the dots on the wheel around to select your main color, and the colors that fall within the range of your chosen arrangement. On the left are four blocks in a row that show the main colors of your selection, above a larger block showing some different shades of your palette. Below the wheel are tabs that allow you to play with brightness, saturation, and contrast. If you do happen to be designing for a website, or need a color for your digital art, you can get a list of the colors with their hexadecimal codes. There are even controls for viewing the colors as people with different kinds of color blindness see them. I could write a how-to guide for this application, but really, the best thing is just to go play with it. Try everything on the page, just to see what it does.
If Color Scheme Designer can't break you out of your color block blues, I don't know what can!
P.S. Idle fun for sports fans: set the color wheel to "complement," then pull the dots around and see how many team colors you can find. ;)
Happy New Year!
I know, I'm almost a month late to be offering such greetings. If you look back through my posts of the past year, you'll see that you might consider yourself lucky to be reading anything from me at all, given how infrequently I've posted in that time.
I'm not usually one to go for the whole New Year Resolution thing, but I've decided to make just one this year. You're all witnesses, and I expect you to call me on it if I fail. Here goes:
I, Carin Huber, Mad Craftwoman Extraordinaire, hereby resolve for the year 2010 of the Common Era, to make at least one post during each month of substance, where "of substance" means not relating strictly to my craft woes or published works (though those posts will continue to appear as well), but shall impart useful knowledge, whether it be a tutorial of my own making, or discussion of others' works or events, or of trends in craft. Making two such posts in one month will not excuse me from making another one in the following month. Posts intended to fulfill this resolution will carry the label "resolution," along with any other applicable labels.
Okay, there it is. I'm counting on you to poke me with a stick if a month comes and goes without a substantive post here from me. And, no, this post doesn't count as "substantive." That one's coming next. :)
Subscribe to:
Posts (Atom)