The news, thoughts, designs, dreams, and confessions of Carin Huber, craft designer and writer.
Saturday, July 22, 2017
You may Bee right.
Far be it from me to do anything in the standard way. Rather than building or buying a traditional hive box, I recently acquired a sturdy but somewhat beaten-up highboy dresser to convert into a hive.With its all-solid-wood construction, a thorough coat of exterior house paint, and some ingenuity, I expect it to hold up for quite some time.
I've started the new paint job. It may not look like much of a change from the old colors yet, and in fact the old colors influenced the new ones. But it will be a distinctive design, with varying shades of dusty lavender and pollen yellow set off by crisp white.
The drawers will be stocked with top bars, allowing the bees build the comb down from the top, more or less as they please. My plan is to make the second drawer from the bottom the main hive, or "nuc" in the parlance of beekeeping. This is where the queen will lay eggs, and the workers will raise brood and store pollen and honey to feed the hive.
Each hive drawer will have two or three entrance holes drilled through the front. Unused drawers will have corks in the entrances to keep them from being colonized all willy-nilly, but once the nuc drawer is pretty well established I'll connect it to the drawer above by means of a length of tubing run between a hole on the nuc and a hole on the new drawer. This will give the bees access to more space without allowing them to build in the body of the dresser. If they need still more room before I start collecting honey comb for my own use, I'll add a tube from that drawer to the next one up, and so on, as high as the second drawer from the top.
The bottom drawer will be storage. The top drawer will be altered to provide access to the top of the drawer below it for maintenance and feeding, if necessary, while keeping that drawer closed.
You may have noticed the dresser is missing a couple of knobs. I've moved the odd yellow knob down to keep the odd grey knob company. They will soon both be lavender.
In their place on the second drawer down will be cast metal bee knobs, already looking aged and worn to perfection.
The finishing touch will be art work, like the bees at the top of this post, courtesy of Karen at The Graphics Fairy. She combs estate sales and antique stores to source print art that has fallen into the public domain. Many of these pieces she shares as free printables on her blog, along with instructions for beautiful crafts you can make with them. She also gathers images into theme packages you can access via a monthly subscription. If you just think you might want some piece of vintage art for a project, you must visit The Graphics Fairy!
Time for a cup of tea. Where did that jar of honey get to?
Sunday, July 9, 2017
Ob-la-di, Ob-la-da.
While I may not have produced much art recently, I have been thinking about it, and some of those thoughts are finally starting to take shape in the real world. There is a highboy dresser in my backyard waiting to become something the manufacturer probably never dreamed of. There is a stack of styrofoam insulation leaning against my empty aquarium. And I still have plans to cut holes in the end of my storage shed.
What the hell am I up to with these things? Stay tuned.
And there's more, an even grander project in the works. It's a project so big I've enlisted the help of friends and colleagues across the United States to help me make it a reality. But that's all I have to say about that right now.
Life, eventually, goes on. :)
Saturday, December 27, 2014
Mother's Christmas Slippers
Slippers!
This is a simple single-crochet pattern that makes up in just a few hours. Each slipper is worked in one piece with just a short seam at the back of the heel. Rounds are not joined; the toe boxes are crocheted in a spiral.
Saturday, March 2, 2013
How Did I Miss This?
No more starting chains for me! :D
Saturday, February 2, 2013
Yarn Noodles
This post rambles a bit. Whatever; it's craftemplation. :)
I've been working on three different knitting projects lately, which I'm loving, but I'm also starting to get the itch to do something different. This happens to me all the time. I'll get hooked on a particular craft, go at it like mad for a while, then get bored and want to do something else. Eventually I circle back to the first craft; it goes in cycles.
One of the knitting projects I've been doing is Slither, and I love it! It's the first thing I've knitted that wasn't just flat, and there are different kinds of increases and decreases, so I get to see how they work and why they matter. You can find my notes on my progress at my Ravelry project page (though you will need to have a [free] Ravelry account to see it.)
So, I'm nearly done with my Slither gloves, and I'm already wanting to plan another project, but I'm thinking crochet, which I've been doing far longer than I've been knitting. I started surfing the patterns available through Ravelry, and Oh My Gods, so many beautiful patterns, and so many of them available for free! There are some crocheted shawls and stoles I would love to try, but they look like the beginning chains are sooooo long!
The hardest, most frustrating part of any crochet project for me is working that first row into the stitches of the starting chain. I crochet with a really tight tension, so much so that I usually have to go up at least two hook sizes to match gauge on someone else's pattern. This means that while my work may come out the right size, I still have a hard time working the hook into those tight chain stitches. If I make the chain with a larger hook, this might give me the room to move that I need to not go crazy, though I would need to make sure doing that wouldn't adversely affect the project.
But what if, instead of crocheting a starting chain, I cast on the required number of stitches as for knitting, using a long-tail cast-on on a convertible circular needle? If I use a needle size to match the hook size, I'll end up with perfect little loops that stand up free from the bulk of the cast-on, resting loosely along a thin cable. If I take one needle off after casting, insert the hook in the first stitch, pull up a loop from the working yarn and start crocheting into each stitch while it still sits on the cable, the cable should slip out easily enough once the first row is done.
Hmmmm....
I'll let you know how it comes out.
Image borrowed from Patricia at Knitting for the Soul.
Monday, January 28, 2013
Getting Good Gauge
New knitters and crocheters usually start with projects that are small, flat, and rectangular, like dishcloths and winter scarves. Usually these projects completely ignore the issue of gauge, as it just doesn't matter. You knit or crochet until it's the size you want, and you're done. And that's fine, as long as you never want to make anything else.
Yarnologue posted an excellent explanation of knitting gauge, why it matters, and how to adjust to get the correct gauge. This information applies to crochet as well.
There, now that you understand gauge, go forth and drown your parents in socks, gloves, and hats. Heap piles of plushies upon your nieces and nephews. Stop your sister's shivering with shawls.
Just don't knit a sweater for your boyfriend.
Sunday, July 24, 2011
Pressing Matters
Ironing Sucks!
Enjoy!
Friday, July 8, 2011
Want-to vs. Ought-to
I plan to make the Fall Silver Shawl, available for purchase from Ravelry (you'll need a Ravelry account to visit that link, but the account is free.) I have the pattern downloaded, I have the yarn, and my fingers have been itching to start for days, but I need to buy needles for this small yarn, and I have a custom order crochet project that's waaaay overdue, and I owe blanket blocks to seven or eight people from last year's swap, and I have multiple projects to finish for the AntiCraft, and flutter sleeves to make for my formal dress, and and and....
Sigh.
Someone kick me in the ass, please?
Thursday, June 30, 2011
Count-free Flat Round Crochet
Through experience, I have learned that my stitches will tell me when it's time to increase. Once you can read your stitches, you never have to count again to make your own free-handed flat circles. (If you're following someone else's pattern, you'll still want to match their directions, of course, to make sure the stitch count comes out right.)
So, here's what single and double crochet stitches look like, worked in straight rows. I show this as a base comparison:
I know, the single crochet doesn't look like a straight row, but that's just because I wasn't careful enough laying the piece out for the photograph.
Here's what the same stitches look like worked in a flat round, between two increases. See how the single crochet stitch looks like a V at the bottom, and the double crochet stands up straight?
And here are the stitches telling me it's time to increase. See how the left arm of the V in the single crochet is straight up now, and the double crochet visibly leans to the right? If you're working left handed, your stitches will lean toward the left, instead.
When you see that lean, add another stitch in the same place.
Then continue on, placing one stitch in each stitch of the previous round until you see the lean again.
That's it, no more counting stitches to keep your work flat, and no more frogging to fix unwanted curling or cupping. If you need to end up with a certain number of stitches (say, to add a shell stitch edging, or somesuch) just count up how many stitches around you have at the moment, figure out how many more you need, and stop stitching when you've added enough increases to get to that number.
Everybody gets hot pads for Christmas! :D
Tuesday, May 31, 2011
the biggest pinhole omelette since the times of Dadaism
Hatch yourself from an egg, photographically. It's simple, but, apparently, not easy. Is it worth it? Maybe I'll let you know someday. All I know right now is that it's damned cool!Photo by francesco
Tuesday, April 19, 2011
That Waxy Buildup

acrylic:

and oil:

which none of those are.
This is encaustic art, painting done with colored wax. You may not have heard of encaustic art before, but it’s far from being a new technique. Some of the earliest extant examples are Fayum Mummy Portraits, dating from around the second century C.E. Some sources cite the ancient Greeks, who sealed and decorated their ships with colored wax in the fifth century B.C.E.
Modern conveniences, like electric irons and heated styli, have made encaustic art easier to learn than ever, and there is a surprising amount of information and suppliers at your fingertips right now. Just ask your favorite search engine about “encaustic art,” but make sure you have plenty of time to spend surfing the results. :)
Here are a few links to get you started:
Arts Encaustic: This is the source of those lovely paintings above. They offer very nice tutorials with clear photos, and free online videos for beginners to get you comfortable with the techniques. They sell everything you need to get started and then some, including videos, pre-cut cards, and rubber stamps. Be aware that they are in the U.K., so if you’re not, you’ll either need to pay extra for shipping or find a local distributor.
Joe’s Introduction to Encaustic Arts: This is another excellent tutorial with large, clear pictures. Perhaps the real gem here, though, is the website on which it’s posted, Wet Canvas, which is an online community for painters and illustrative artists of all sorts.
And if that really whets your appetite for wax, here are the “encaustic art” results for Amazon.com and Powell’s Books.
Wax on; wax off. ;)
Saturday, March 19, 2011
Sticks and Straps
I’ve been toying with the idea of getting back into band weaving lately, but I no longer have an inkle loom, the funds to procure one, nor the space to store one.Fortunately there are backstrap looms. Made from little more than a warp tied between a hip-belt and a stationary point via some cleverly inserted sticks, a backstrap loom can be made from items you may have around the house. (Got an old broomstick you can cut up?) Even if you don’t have the materials on hand, dowels are cheap to buy at the hardware store. A sturdy scarf can serve as your backstrap until you can weave your own. Because there is no frame, your weaving or loom parts can be bundled into a bag or box between sessions, so it takes very little storage space.
It’s been a while since I did anything with a backstrap loom, and then it was for card weaving, so I didn’t use heddles and such. I needed a refresher course.
I found stunningly clear instructions at WeaveZine. Laverne Waddington’s "Backstrap Basics" takes you step by step through the process of assembling, warping, and weaving on a backstrap loom, with beautifully done photos and videos. There are two projects; a simple band to get you familiar with the weaving process, then a strap to replace the pillowcase she recommends using in a pinch. There are links to Laverne’s own blog, where you can learn more advanced weaving techniques, like stripes, warp floats, and supplemental wefts. And look through the comments, too, for a few more tips.
Now, what did I do with that broomstick I stashed away...?
The photo above is used here with kind permission of "Ursula in BKK," from her photoblog of her travels, Weekly Wanders. This photo is from her post about visiting with the women of Taliang, Laos, who have made a cottage industry of their exquisite weaving. It's a wonderful read; go take a look!
Sunday, February 20, 2011
This One's Letterfu is Strong.

You're at your computer printing out thirty party invitations when you discover you only have 3 envelopes. What to do?
Run those invites through the printer again and print a design from Letterfu on the back. Five folds and a tuck turns the invitation into its own envelope, sealed with the postage stamp. There are 4 designs available on the Letterfu website, links to several other folks' designs, and all the tools you'll need to create your own vector designs.
So, when's the party?
Monday, January 31, 2011
Narcissity
I have long hair, and I’ve decided to grow my bangs out. They just haven’t looked as good as I’d like for a few months. About the only way to grow one’s bangs out at all gracefully is to wear hairbands, but I have a problem.
I have a fat head.
On top of that, my head is really pressure sensitive. Oh, it’s not changing weather that gives me a headache, it’s anything squeezing my head that does it. It’s instant - I can feel the headache coming on within a minute of putting on too small sunglasses, which is all of them. I can’t use headphones that are connected to a band, only the ones that clip over your ears individually. (Earbuds are excruciating to me, too, so they’re no help.)
So buying hairbands is hard for me. Most of them are too small, which means they squeeze me into an instant headache. Sometimes I can stretch them out enough that they work for a while, but doing so inevitably pops some of the stitches, and they don’t last long after that.
Clearly, the solution is to make my own. Clearly I have to make them using my most recently acquired crafting skills, in this case, knitting. Clearly I can’t follow someone else’s pattern, because then it wouldn’t be all about me, and I would seem less cool as I told you all about how I did it.
Tell me, do I seem narcissistic, or am I really that good? ;)
A yarn with some elasticity will fit and stay on your head better than 100% cotton, linen, or silk.
You should be able to get at least two Narcissity hairbands, possibly more, from one average sized ball or skein of most yarns.
The main decoration in Narcissity is a simple 2x2 cable, so you’ll need a cable needle, as well. This is a good project for your first attempt at cabling since the cable is so simple, and the project is small enough to not be heartbreaking if it doesn’t come out well the first time.
NB: I don’t care for the purl bump that the standard knit-front-and-back gives, especially in a project this small where every detail makes a difference. I have discovered that knitting the back loop first, then the front loop, gives me a smooth front surface, with the increase looking more like natural growth than cut-and-paste. The notation I have used for this increase is kbf.
Terms and Stitches Used:
co = cast on
RS = right side (front of fabric)
WS = wrong side (back of fabric)
stockinette = fabric that shows only knit stitches on the right side of the fabric. When working back and forth on flat fabric, this means that you will alternate rows of knit and purl stitches.
k = knit
p = purl
kbf = knit back and front (see NB above)
p2tog = purl two together
If you don’t know how to perform any of the stitches, just do a search for them on Google or another search engine. There are lots of good tutorials for knitting on the web. Searching for “knit front and back” should help you understand my “knit back and front.”
Measurements are given in inches. To convert to metric, remember that one inch is approximately equal to 2.5 centimetres.
INSTRUCTIONS:
FIRST TIE
Co 4.
Work in stockinette for 6”, finishing with wrong side (WS) row.
INCREASE SECTION
Row 1:(RS) k1, kbf twice, k1 (six stitches)
Row 2:(WS) purl across.
Row 3: k2, p2, k2
Row 4: p2, k2, p2
Row 5: k1, kbf, p2, kbf, k1 (eight stitches)
Row 6: p2, k1, p2, k1, p2
Row 7: k2, p1, k2, p1, k2
Row 8: repeat row 6
Row 9: k1, kbf, p1, k2, p1, kbf, k1 (ten stitches)
Row 10: p2, k2, p2, k2, p2
Row 11: k2, p2, k2, p2, k2
Row 12: repeat row 10
Row 13: k2, p2, kbf twice, p2, k2 (twelve stitches)
Row 14: p2, k2, p4, k2, p2
MAIN (CABLE) SECTION
Measure the length of your Increase Section. Subtract this length from 20 inches. Work Rows 15 through 18 until your Increase and Main Sections combined measure this amount, or as close as you can get, finishing with Row 17.

Row 15: k2, p2, slip next two stitches from left needle onto cable needle, and bring to front of work. K next 2 stitches on left needle. Return stitches from cable needle to left needle, and knit them. P2, k2.
Row 16: p2, k2, p4, k2, p2
Row 17: k2, p2, k4, p2, k2
Row 18: repeat row 16
DECREASE
Row 19: p2, k2, p2tog twice, k2, p2 (ten stitches)
Row 20: k2, p2, k2, p2, k2
Row 21: p2, k2, p2, k2, p2
Row 22: k3, p1, k2, p1, k3
Row 23: p1, p2tog, k1, p2, k1, p2tog, p1 (eight stitches)
Row 24: k2, p1, k2, p1, k2
Row 25: p2, k1, p2, k1, p2
Row 26: k3, p2, k3
Row 27: p1, p2tog, k2, p2tog, p1 (six stitches)
Row 28: k2, p2, k2
Row 29: purl across
Row 30: knit across
Row 31: p1, p2tog twice, p1 (four stitches)
LAST TIE
Work in stockinette for 6”. Bind off. Block as needed, but leave the ties alone to curl.
Thanks go to Rogue at Rogue Knits for testing my first ever knit pattern. You rock, Girlfriend!
Saturday, January 1, 2011
If at first...
So, yeah, what I said back here? Ditto for 2011.
Wish me luck. :)
Sunday, July 25, 2010
Wednesday, July 21, 2010
No, I Didn't Die.
Wednesday, July 7, 2010
Make Your Mark
My dad and I recently learned about letterboxing. It's an informal treasure-hunt sort of game, similar to geocaching, that began with a gentleman's calling card left tucked into a bottle near a remote English pond in 1854. In the modern version of letterboxing, one follows clues left on a website to find a secret stash containing a rubber stamp and a logbook. The adventurer brings their own signature stamp and logbook along, stamps an image from their signature stamp into the letterbox's book, and takes an image of the letterbox's stamp away in their own logbook.While there's no rule against using a store-bought stamp, either for your signature or for the letterbox, it's so much more personal to create your own design. Indeed, the vast majority of letterboxers use stamps of their own design. They may have the stamps custom made by a stationery company, or carve them themselves from rubber erasers. Being somewhat uncertain of my ablility to carve a rubber eraser, and displeased with the small size of the erasers I found, I went looking for an alternative material. I found it in craft foam sheets.
You will need:
One sheet of adhesive-backed craft foam
One sheet of 6 mm thick craft foam
A craft knife
A cutting surface
A stamp pad with a raised surface, or a watercolor pen
Your stamp design
Your design can be quite detailed, but you should probably try not to get too fancy with your first attempt. You can hand draw your design or use a graphics program to create one. Consider the size of your image carefully. It should be small enough to fit on a small logbook page, but large enough to be easy to cut out of the foam. I chose a daffodil design that I use elsewhere as well, and my dad created a simple radio tower design, alluding to his ham radio hobby. We decided that three inches in the largest dimension of our designs would likely fit well in most logbooks.
As you work with the adhesive-backed foam sheet, be careful not to press your fingernails into the foam. It will take impressions from your nails rather easily, and your stamped design may have small crescent-shaped voids as a result.
I found that carbon paper refused to transfer to the foam, so I cut the designs out of their paper print-outs with the craft knife, then used them as stencils to apply the design to the foam. My daffodil design was already created in a stencil-like negative image, with the pieces of the flower cut from the background. With the finished stamp, the background would be printed, while the flower remained the white of the paper. My dad's radio tower, however, was a positive image with crossbars that needed careful handling in cutting the transfer stencil. I left thin bands of paper between the crossbars and the uprights on the paper stencil, to hold the design together. I would later cut through these lines when cutting the design from the foam sheet.Place the stencil on top of the adhesive-backed foam and ink through the stencil with the stamp pad. (If your design has letters or any other element that requires a certain direction, make sure to put your stencil down backwards.) I had a little trouble getting all the smaller parts of the pattern inked, and by the time I did, there was a good bit of ink bleeding through the paper onto the foam. I think a smaller, dauber-type ink pad or a water color pen would have worked better, but I didn't have either of those, and I was able to see the design clearly enough on the foam to cut the design out.
With your craft knife, cut the design out of the foam. There are a couple things to which to pay attention as you cut. The first is that you don't undercut the edge of the stamp. It's best to angle the blade of your craft knife away from the piece at the point of the blade, so as to ensure adequate support to the edge of the foam. The other is that you either start at one side of the pattern and work across, or start at the center and work your way out. This is so that the piece you're cutting always has as much support from the surrounding foam as possible. On my daffodil, if I had cut all the petals first, then cut the trumpet out, I would likely have broken through the lines as the lack of support allowed the foam to stretch and flex.
If your image has several separate pieces, and their exact placement on the stamp is important, don't just cut the pieces out willy-nilly. With my dad's radio tower, I chose to cut the tower out first, as the anchor of the design. I stripped the paper backing off of the adhesive back of the tower, and placed it on the 6 mm thick foam sheet. Then, one by one, I cut a lightning bolt, but did not remove it from the surrounding foam. Instead, I removed the paper backing from just the lightning bolt, fitted the surrounding foam around the tower on the 6 mm thick foam sheet, pressed the lightning bolt down, then removed the surrounding foam from the now-adhered bolt.Once you have all the pieces of your design adhered to the 6 mm thick foam backing, cut the stamp from the rest of the sheet. Cut off any excess backing that isn't supporting the image. Doing this will help prevent accidental stamping of the edges of the backing. Ink your stamp and make a test imprint on a piece of paper. If you use watercolor pens, you can color different parts of the stamp different colors for a multicolor image.
Congratulations! You've made your very own personalized stamp. Now, go gently clean it with water and an old soft toothbrush. The ink will never completely dry on the foam, so cleaning it off will reduce accidental stamping on your clothes and furniture, as well as prevent a buildup of residue that can reduce the quality of your impressions.
Not only are craft foam stamps easy and fun to make, they are incredibly cheap! Having a 3" x 3" custom stamp made professionally costs about $25. Both the self adhesive foam and the 6 mm thick foam were a mere 99 cents per sheet. I made two stamps, and have enough foam left over for at least another four stamps of the same size. This means that each stamp used about 30 cents worth of foam. That's what I call thrifty!
Happy stamping!

For more information on letterboxing, visit the Wikipedia entry at http://en.wikipedia.org/wiki/Letterboxing .
Sunday, July 4, 2010
Summertime Tea-ser
One of my favorite treats for summertime (and 4th of July barbeques, naturally) is suntea. The gentle warmth of the sunlight coaxes the flavor from even the cheapest Lipton's knock-off, without drawing out the bitter taste that boiling water stews from the leaves. Plus, there's something so relaxing about setting the jar of cool water and tea bags out, finding just the right sunny spot, then going about my business for an hour or two. With hot-brewed iced tea, I always worry that the container is going to either melt or break when I'm pouring hot tea over the ice, and it takes so long to cool to drinking temperature. Somehow, I associate the act of boiling the water for the tea with being in a hurry, and then the hurry is frustrated by the cooling time. Suntea never gets hot enough to threaten the pitcher or jar, and will often cool enough for drinking just in from the sun by pouring it over ice in your glass.
So, why am I talking about sun tea in a craft blog? Well, food can certainly be craft or art, completely aside from decorating or garnishing. Any foodie will tell you that. It's how the food tastes that really makes it art. Sculpting mashed potatoes into a bust of Beethoven would certainly be impressive, but if the potatoes taste like paste when they're served up, the dish is really a "bust."
While simple black tea makes a perfectly satisfying iced drink, I like to enhance the flavor by including a few bags of a flavored tea blend in the jar. Most often I choose Earl Grey, which is my favorite flavor of tea for drinking hot in cooler weather, but sometimes I fancy mint instead. (I also sun brew mint alone from time to time. Mint and black tea together are a wonderful hot drink, as well.) There are both peach and pear flavored herbal teas that are lovely added to a black suntea. If you like the flavors of flowers (some don't), try adding rose petals, lavender buds, or jasmine flowers. Just make certain the flowers are food grade, or from a garden that doesn't use chemical pesticides. Muslin bags for loose teas are available at most whole foods stores with the bulk teas, so you don't have to strain your tea to remove the flowers. If your black tea is loose as well, you can use a muslin spice bag, which is made to hold herbs and spices for flavoring a clear stock. The flowers or loose flavored tea and the black tea can go in the same bag.
My basic "recipe" for suntea is this:
1 gallon of drinking water (some folks get good water from the kitchen tap, some don't.)
8-10 bags of black tea (or 8-10 teaspoons of loose black tea in a muslin spice bag)
2-4 bags of flavored tea (or 2-4 teaspoons of loose flavored tea in a muslin bag)
Your jar or pitcher can be glass or plastic, and should be clear or translucent. A decorative print on the container is fine, as long as it still lets the sunlight through.
Fill the container up with the drinking water, and add the bag(s) of tea. If the cover for the container is screw-on (like a jar lid), try draping any strings from the bags over the edge of the container opening, making sure that the bags can still hang down into the water deep enough to submerge them. You should still be able to screw the lid on, and this will keep you from having to fish the sodden bags (and paper tags!) from the bottom of the container later.
Find a spot outside (or in a window sill) that will receive bright sunlight for at least a couple hours, and set your container there. Find something else to do for those couple hours until the tea is nicely colored. Remove the teabags and serve over ice.
I don't sweeten my tea in the jar anymore because I want others to be able to drink the tea with the sweetener of their choice, or with no sweetener at all if they prefer. Most manufactured stevia-based or artificial sweeteners dissolve pretty readily in a cold drink with just a couple stirs. Good old-fashioned sugar, on the other hand, likes to settle in a gritty, too-sweet pile on the bottom of the glass.
If natural sweetness is your preference, make a simple syrup. Combine a cup of granulated sugar and a cup of water in a pot over medium-high heat. Bring it to a boil, turn the heat down to just over a simmer, and stir for a minute until the sugar all dissolves. Take the syrup off the heat and let it cool to room temperature. You can either stir this directly into your jar of tea to sweeten the whole gallon, or keep it in a syrup pitcher for folks to sweeten their own glasses of tea.
Ahhhh. Tea. :)
Tuesday, April 6, 2010
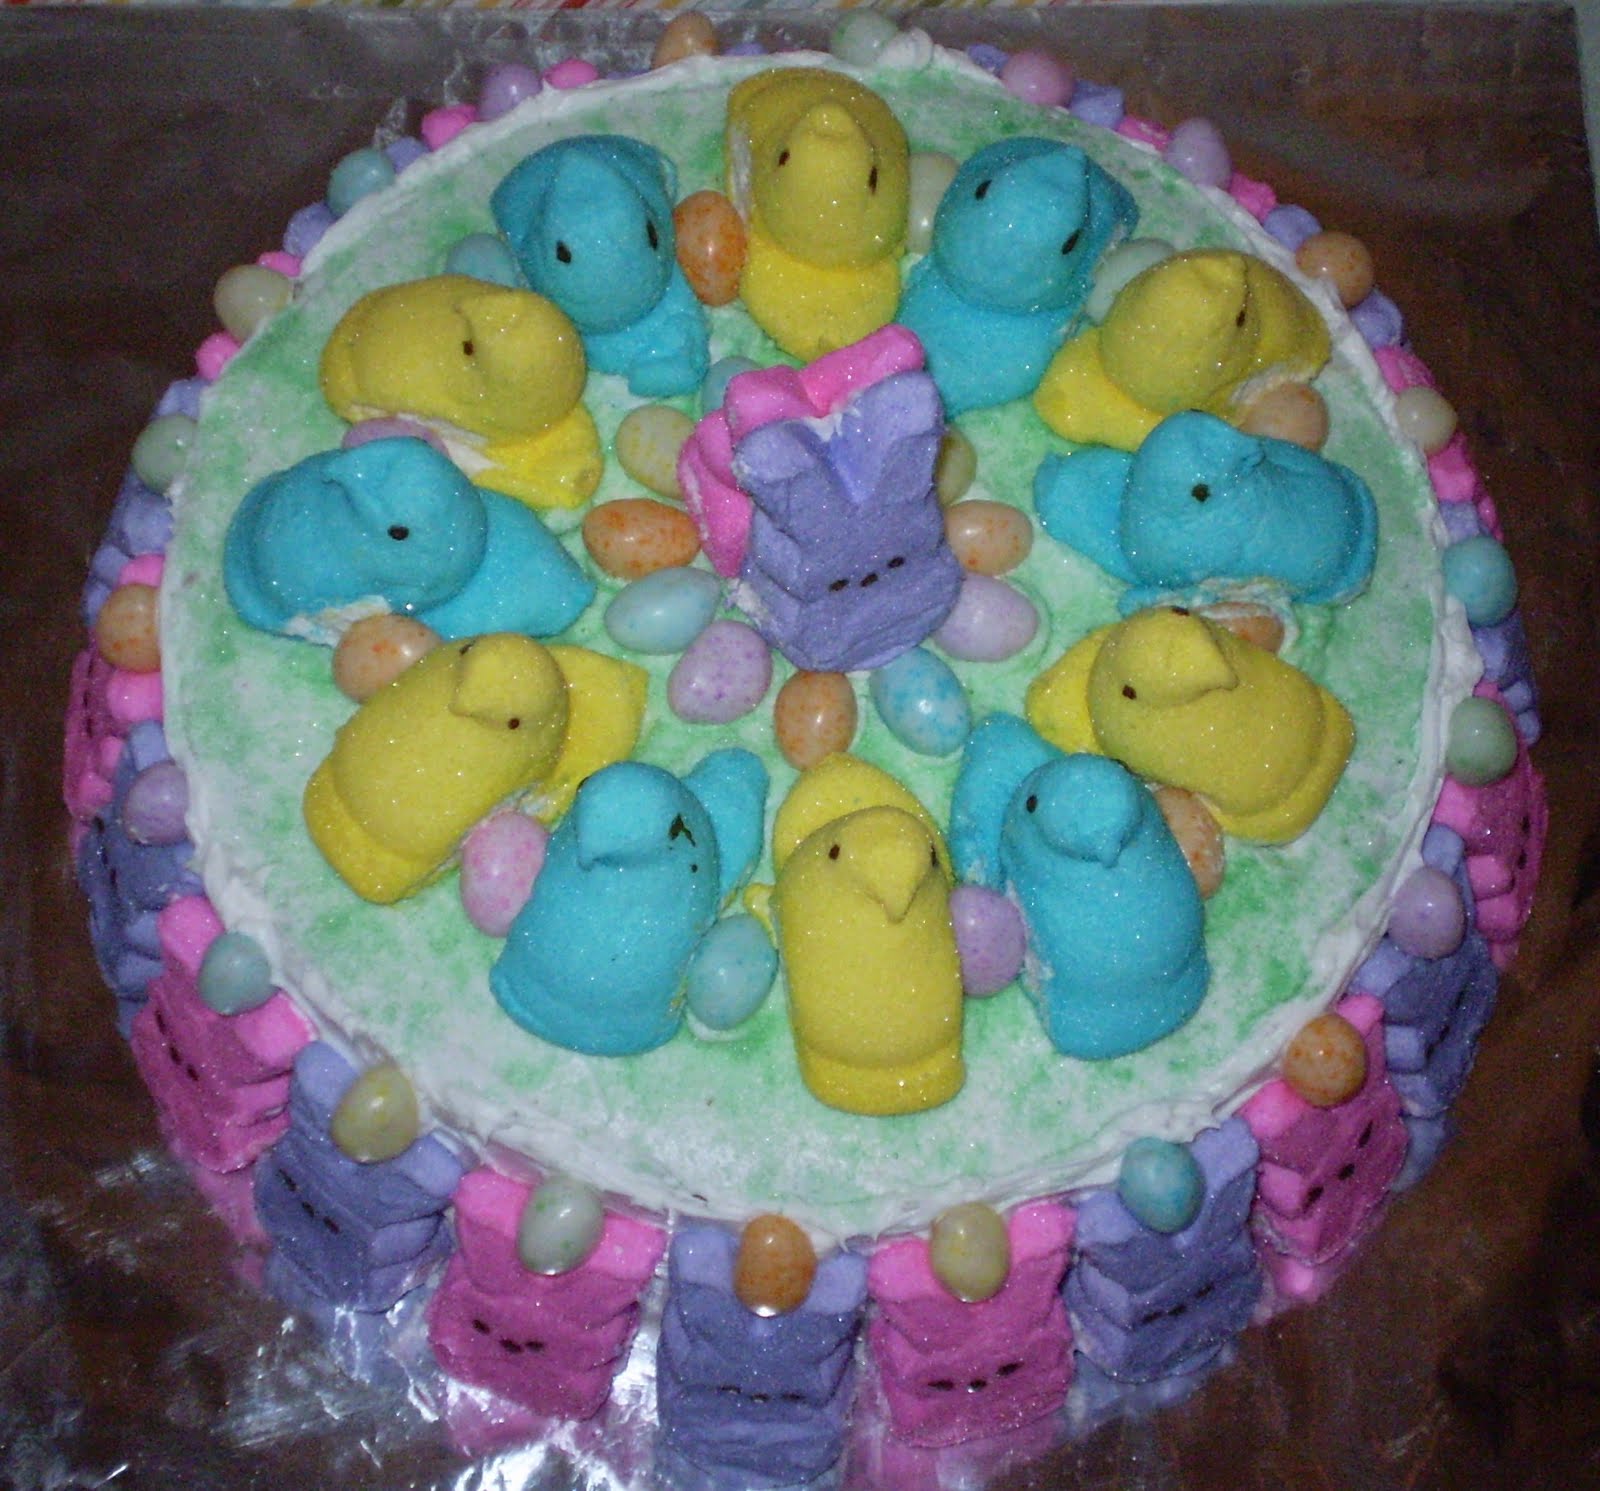
In the Temple of the Marshmallow Kings
Sugar-coated marshmallow methods.
Behold, the Temple of the Marshmallow Kings:
MuwAHAHAHAHAHAHAAAAAAAAAAcoughcough, ahem....
Marshmallow priests encircle their two-faced god, while worshippers bring more offerings of jelly-bird gems.
Those who pass within the temple walls find respite in the pastel splendor of the cakey sanctuary.
The cake itself was made using the method (but not the recipe) found at Omnomicom.